Clear and Safe: The Importance of Muster Point Signage
Why Muster Point Signs Are Critical for Australian Workplaces
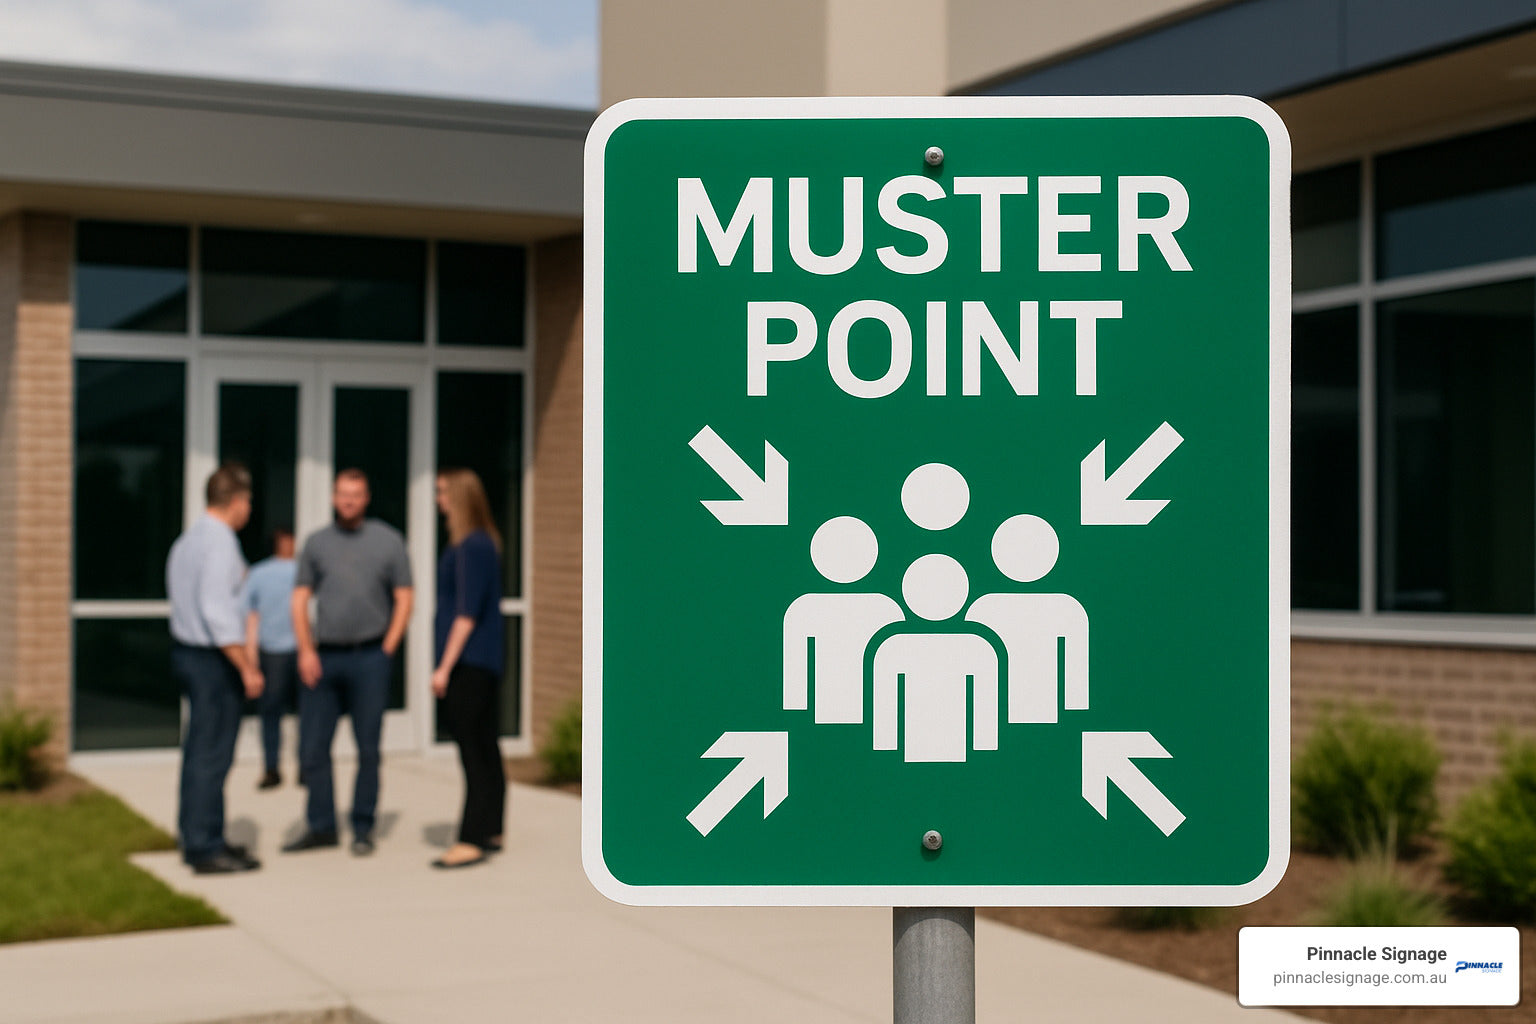
Muster point signs are essential safety devices that clearly mark designated emergency assembly areas where people gather during evacuations. These signs help save lives by directing employees, visitors, and emergency responders to safe locations away from buildings and hazards.
Key Features of Quality Muster Point Signs:
- Green background with white symbols (AS 1319 compliant)
- Reflective materials for visibility in low light
- Weather-resistant aluminium or polypropylene construction
- Pre-punched mounting holes for easy installation
- Service temperature range from -40°C to 100°C
The research shows that muster points should be located at least 1.5 times the building height away from structures. For example, a 20-metre building needs its muster point at least 30 metres away to protect people from heat, smoke, and falling debris.
Common muster point sign sizes include 18" x 12", 18" x 18", and 24" x 24". High-quality reflective aluminium signs typically last 5-10+ years outdoors, making them a smart investment for any facility.
As someone who spent years in the safety and industrial supply space before founding Pinnacle Signage, I've seen how poor signage can create confusion during emergencies. That's why we focus on delivering muster point signs that meet Australian standards and arrive when you need them - often weeks faster than competitors.
Must-know muster point signs terms:
Best Muster Point Signs You Can Buy in 2024
Finding the right muster point signs for your Australian workplace has become much easier, thanks to significant improvements in materials and manufacturing. Today's signs are built to handle everything from the scorching 45°C heat of a Darwin summer to the salt spray along our coastlines, with service temperatures ranging from -40°C to 100°C.
After working with hundreds of Australian businesses, we've found that most requirements fall into three main categories. High-intensity reflective signs work brilliantly for permanent installations where visibility is critical. Budget-friendly polypropylene options are perfect for construction sites and temporary facilities. And glow-in-the-dark variants provide essential backup visibility when power fails or emergency lighting isn't available.
The key is matching your sign choice to your specific environment and timeline. A mining operation in the Pilbara needs different durability than a temporary construction site in Melbourne's CBD.
"High-Intensity Reflective" Muster Point Signs
When you need muster point signs that will still be clearly visible in ten years' time, high-intensity reflective options are worth the investment. These premium signs use genuine 3M High Intensity Grade sheeting that reflects three times more light than standard materials - crucial when seconds count during an emergency.
The difference becomes obvious at dawn or dusk when natural lighting is poor. Where standard signs might appear dull or hard to read, high-intensity reflective muster point signs practically glow under vehicle headlights or torch beams.
We build these signs on 0.080" thick aluminium substrate - that's 50% thicker than many alternatives you'll find online. The extra thickness prevents warping under Australia's intense UV exposure and temperature swings. Each sign comes with pre-punched, burr-free mounting holes and a laminated surface that resists graffiti and weathering.
The 10+ year durability rating makes financial sense for permanent installations. Research shows that 3M Diamond Grade sheeting returns almost 60% of available light to viewers - nearly double other prismatic materials. This improved visibility is particularly valuable for large facilities where people might be evacuating from considerable distances.
"Budget-Friendly Polypropylene" Muster Point Signs
Not every application needs a decade of durability. For construction sites, temporary facilities, or projects with defined timelines, polypropylene muster point signs deliver excellent value while maintaining full AS 1319 compliance.
These lightweight signs are 40% lighter than aluminium equivalents, making them much easier to relocate as your site layout changes. They're also surprisingly tough - polypropylene actually handles impact damage better than rigid materials, bouncing back rather than denting or cracking.
The 3-5 year outdoor lifespan suits most construction projects perfectly. By the time the sign needs replacing, your project is likely complete anyway. And because polypropylene is fully recyclable, you're not creating unnecessary waste.
We particularly appreciate how quickly we can turn around polypropylene muster point signs - often within 2-3 business days for standard designs. This speed matters when you're setting up new sites or responding to safety audit requirements.
"Glow-in-the-Dark" Muster Point Signs
Power outages and emergency lighting failures happen at the worst possible moments. That's when photoluminescent muster point signs prove their worth, continuing to provide clear visibility for hours after the lights go out.

The photoluminescent technology is remarkably simple and reliable. During normal operations, ambient lighting charges the special pigments embedded in the sign face. When darkness falls, these pigments release stored energy as a soft green glow that remains visible for 8+ hours.
We see these signs making a real difference in underground facilities, large warehouses with limited natural light, and remote locations where backup power isn't guaranteed. They're also valuable for 24-hour operations where shift changes might coincide with emergencies.
The AS 1319 compliant green background with white symbols ensures consistency with your other safety signage, while the maintenance-free operation means no ongoing electrical costs or lamp replacements.
How to Choose the Right Sign for Your Site
Choosing the right muster point signs for your workplace isn't just about ticking a compliance box—it's about creating a system that genuinely protects people when seconds matter. The most effective approach starts with understanding your site's unique characteristics and matching them to the appropriate sign materials and placement strategy.
The foundation of proper selection begins with the 1.5 × building height rule. If you're managing a 15-metre warehouse, your muster point needs to sit at least 22.5 metres away from the structure. This distance isn't arbitrary—it protects evacuees from radiant heat, smoke plumes, and potential structural collapse while ensuring emergency vehicles can access both the building and assembly area without obstruction.
Your material choice should reflect both your site's permanence and environmental challenges. Aluminium signs excel in permanent installations, particularly in high-wind areas or where premium visibility is non-negotiable. Polypropylene options make perfect sense for temporary sites, construction projects, or situations where you need to relocate signs frequently. Photoluminescent materials become essential in areas with unreliable lighting, underground facilities, or anywhere power outages could compromise visibility during emergencies.
Site-specific hazards demand careful consideration during your selection process. Chemical storage facilities require greater separation distances than standard office buildings, while coastal locations need improved corrosion resistance to handle salt spray and humidity. For detailed guidance on symbol selection and compliance requirements, check out our comprehensive guide on safety sign symbols.
The Safeopedia guide provides excellent coverage of broader muster point strategy and implementation considerations that complement your signage decisions.
Location & Distance Checklist
Getting your muster point location right involves more than measuring distances—it's about creating a space that works under pressure. Clear access routes that don't force people to cross vehicle traffic lanes are fundamental. Nobody should have to dodge delivery trucks or steer busy car parks during an emergency evacuation.
Separation from hazardous materials becomes critical if your site handles chemicals, fuels, or other dangerous substances. The standard 1.5 × building height rule simply isn't enough near chemical storage—you're looking at 2-3 times building height or a minimum 100 metres, whichever is greater.
Emergency responder access needs protection too. Fire trucks, ambulances, and other emergency vehicles need unobstructed routes to both your building and the muster point. Consider how a large fire truck with extended ladders will manoeuvre around your site during an actual emergency.
Prevailing wind direction affects smoke dispersal and can turn a seemingly safe location into a hazardous one. In many parts of Australia, seasonal wind patterns change dramatically, so consider year-round conditions rather than just current weather.
Compliance & Standards Snapshot
Australian Standard AS 1319 creates the framework that ensures muster point signs work consistently across every workplace in the country. The white symbols on green background specification isn't just about aesthetics—it creates instant recognition that transcends language barriers and industry differences.
Colour accuracy matters more than many people realise. The specified green has been chosen for optimal visibility under various lighting conditions, while the white symbols provide maximum contrast for quick identification. Weather-resistant construction for outdoor applications means your signs need to perform through cyclones, bushfires, flooding, and the intense UV exposure that characterises much of Australia.
At Pinnacle Signage, every muster point sign we produce meets or exceeds AS 1319 requirements. We provide compliance documentation with every order, which simplifies your workplace safety audits and helps demonstrate due diligence during regulatory inspections.
Installation & Maintenance Best Practices
Proper installation ensures your muster point signs remain visible and secure throughout their service life. The research indicates that most sign failures result from inadequate mounting hardware or poor installation techniques rather than material defects.
Recommended installation materials:
- Galvanised steel posts for permanent installations
- Stainless steel bolts and washers in coastal areas
- Anti-graffiti laminate for high-vandalism locations
- Concrete footings for high-wind environments
We recommend mounting signs between 1.5 and 2.5 metres above ground level for optimal visibility while preventing vandalism. In car parks, mount above 2.5 metres to avoid vehicle damage while ensuring pedestrian visibility.
Step-by-Step Fixing Guide
Installation process:
- Mark post locations using spray paint or stakes
- Dig holes 600mm deep for standard posts (deeper in sandy soils)
- Set posts in concrete, ensuring vertical alignment
- Allow 24-48 hours for concrete curing before sign mounting
- Attach signs using stainless steel bolts with thread-locking compound
- Apply specified torque settings (typically 25-30 Nm for M8 bolts)
The research shows that pre-punched mounting holes should be deburred and cleaned before installation to prevent stress concentrations that could lead to cracking. We supply all necessary hardware with our muster point signs and provide detailed installation instructions.
Cleaning & Longevity Tips
Regular maintenance extends sign life and ensures continued visibility. The research indicates that signs cleaned quarterly last 30-40% longer than neglected installations.
Maintenance schedule:
- Monthly: Visual inspection for damage, vandalism, or obstruction
- Quarterly: Clean with mild detergent and soft brush
- Annually: Check mounting hardware tightness and replace worn components
- 5-10 years: Consider replacement based on material type and environmental exposure
Use only mild detergent and avoid abrasive cleaners that can damage reflective surfaces. For stubborn stains or graffiti, consult your sign supplier for appropriate cleaning products that won't void material warranties.
Common Mistakes and Must-Know Compliance Tips
Working with hundreds of Australian businesses over the years, I've seen the same costly mistakes repeated time and again. The most dangerous error? Placing muster point signs too close to buildings, which creates a false sense of security while actually exposing evacuees to serious ongoing hazards.
The most critical mistake involves positioning muster points upwind from chemical storage areas. During a fire or chemical release, toxic smoke and fumes travel with the wind – meaning your "safe" assembly area could become a death trap. Similarly, insufficient lighting for night-time visibility leaves shift workers and security personnel unable to locate muster points when they need them most.
I regularly encounter sites with inconsistent numbering systems across multiple locations, creating confusion for staff who work at different facilities. Even worse, many businesses forget to account for visitors and contractors who don't know the site layout. These temporary occupants often represent 20-30% of people on-site during emergencies, yet they're rarely considered in muster point planning.
For detailed implementation strategies and real-world examples, Muster Points Explained: Keeping Your Team Safe in Emergencies provides comprehensive guidance that complements your emergency planning efforts.
Avoiding Sign Clutter
Too many signs create visual chaos that actually reduces effectiveness when people are stressed and trying to evacuate quickly. The research reveals that during emergencies, people can only process a maximum of 3-4 distinct messages simultaneously – beyond that, information overload sets in.
Your primary muster point signs should dominate the visual landscape, being the largest and most prominent elements in your emergency signage system. Directional arrows need to support rather than compete with the main message, while supplementary information like contact numbers and detailed procedures should remain clearly readable but visually secondary.
Maintaining consistent colour schemes across all emergency signage prevents confusion and reinforces your emergency response system. The AS 1319 green background with white symbols isn't just a legal requirement – it provides optimal visibility across diverse lighting conditions and viewing angles that you'll encounter across Australian worksites.
Assigning Multiple Muster Point Signs
Large facilities often need multiple assembly areas to prevent dangerous overcrowding and reduce evacuation times. The research suggests that individual muster points should accommodate no more than 200 people for effective roll-call procedures – beyond that number, accountability becomes nearly impossible.
Assigning departments or floors to specific muster points creates clear expectations and reduces decision-making during stressful situations. Clear numbering systems using simple sequences like 1, 2, 3 or A, B, C work better than complex codes that people might forget under pressure.
The key principle: occupants should never need to travel past their designated assembly area to reach safety. This approach minimises evacuation time and prevents the confusion that leads to people heading in wrong directions when every second counts.
At Pinnacle Signage, we help design comprehensive muster point signs systems with consistent numbering, clear directional signage, and appropriate sizing for expected occupancy levels.
Frequently Asked Questions about Muster Point Signs
How many muster point signs does my facility need?
The number of muster point signs your facility needs isn't just about counting heads—it's about creating a safe, organised evacuation system that works under pressure. Most Australian workplaces follow the guideline of one muster point for every 200 people, but your building's layout and local conditions play a bigger role than you might think.
Building size is your starting point. Single-storey facilities under 1,000 square metres typically manage well with one clearly marked assembly area. But once you're dealing with multi-storey buildings or complex layouts, you'll likely need 3-5 strategically placed muster points to prevent dangerous bottlenecks during emergencies.
Don't forget to count everyone who might be on-site during an emergency. Your regular staff numbers are just the beginning—add contractors, visitors, delivery drivers, and anyone else who might need to evacuate.
How far should a muster point be from hazardous storage?
When you're dealing with hazardous materials, the standard 1.5 × building height rule goes out the window. The separation distance for muster point signs near dangerous goods storage depends entirely on what you're storing and how much of it you've got.
Flammable liquids require 50-100 metres separation, depending on the volume stored. A small paint shop might get away with 50 metres, but a fuel depot needs much more. The heat radiation from a significant fire can cause serious injuries well beyond what most people expect.
Compressed gases are trickier because they can create projectiles if containers fail. You're looking at 75-150 metres minimum, and that's assuming you don't have toxic gases that could create deadly vapour clouds. Wind direction becomes critical here—your muster point needs to be upwind from potential release points.
Toxic chemicals can require separation distances of 100-200 metres or more. We've worked with facilities that needed multiple muster points at different distances because they store various chemical types.
Can I customise colours or numbering on muster point signs?
Yes, you can customise muster point signs within the boundaries of AS 1319 compliance. The green background with white symbols isn't negotiable—that's what makes emergency signs instantly recognisable across Australia—but there's plenty of room for practical customisation.
Numbering and lettering are the most common customisations we handle. Whether you prefer numbers (1, 2, 3) or letters (A, B, C), clear identification helps people find their designated assembly area quickly. We often add directional arrows pointing toward the actual muster location, especially when the sign itself isn't positioned right at the assembly point.
Company logos can be included as long as they don't interfere with the safety symbols. We typically place them in a corner or along the bottom edge where they add professional branding without reducing visibility of the critical safety information.
Conclusion
Choosing the right muster point signs isn't just about ticking a compliance box—it's about creating a safety system that actually works when seconds count. Whether you're managing a busy construction site that needs budget-friendly polypropylene options, a permanent facility requiring high-intensity reflective signs, or a warehouse where glow-in-the-dark variants could be lifesavers during power outages, the secret lies in matching your specific needs with the right materials and standards.
That critical 1.5 times building height placement rule we've discussed isn't arbitrary—it's the difference between a safe assembly area and a dangerous one. For facilities with hazardous materials, that distance needs to stretch even further. And remember, proper installation with galvanised posts and stainless steel hardware means your muster point signs will keep protecting people for their full 5-10 year service life, through scorching summers and wild winter storms.
Here at Pinnacle Signage, we've worked with everyone from mining operations in the middle of nowhere to sleek city office complexes. Each workplace has its own personality and challenges, which is why we don't believe in one-size-fits-all solutions. Our team understands that a coastal facility needs different materials than an inland warehouse, and a 24-hour operation has different visibility requirements than a standard business.
Manufacturing locally in Wagga Wagga means we're not just another overseas supplier promising the world. We use genuine 3M reflective materials and Australian-grade substrates because we know they'll perform in our unique conditions.
Your emergency preparedness deserves more than an afterthought. The employees who rely on clear guidance during evacuations, the visitors who don't know your building layout, and the emergency responders who need quick access—they all depend on muster point signs that perform flawlessly when everything else is going wrong.
Ready to get this sorted properly? Give our team a call for a no-obligation chat about your specific requirements. We'll help you design a system that meets Australian standards while actually working for your unique situation and budget.
For more detailed information about regulatory requirements and compliance best practices, check out Understanding Australian Standards for Safety Signs.
Don't leave emergency preparedness to chance—choose muster point signs that deliver when it matters most.