Understanding Assembly Area Signs Made Easy
What You Need to Know About Assembly Area Signs
An assembly area sign is a critical safety marker that shows people where to gather during an emergency evacuation. Here's what you need to know:
Key Facts:
- Purpose: Marks the final gathering point for emergency evacuations
- Design: Green background with white symbols (AS 1319 compliant in Australia)
- Placement: Must be visible from evacuation routes and positioned at eye level
- Materials: Available in aluminium, polypropylene, self-adhesive vinyl, and photoluminescent options
- Legal requirement: Mandatory under workplace health and safety legislation across Australia
When an emergency strikes, clear signage can mean the difference between chaos and calm. Assembly area signs guide evacuees to designated safe zones where emergency wardens can conduct accurate head counts and coordinate with first responders.
These signs differ from muster points (temporary gathering spots) by marking the final location where people remain until the all-clear is given. They're essential for compliance with Australian workplace safety laws and help organisations meet their duty of care obligations.
The research shows that assembly area signs must be clearly visible, weather-resistant, and positioned strategically to handle crowd capacity. From basic vinyl stickers starting around $20 to heavy-duty aluminium signs, the material choice depends on your site's exposure and budget requirements.
I'm Doug Lindqvist, and through my years in the safety and industrial supply space, I've seen how proper assembly area sign placement can transform emergency response outcomes. At Pinnacle Signage, we've helped businesses across Australia implement compliant signage solutions that work when it matters most.

Common assembly area sign vocab:
What Is an Assembly Area Sign?
Think of an assembly area sign as your emergency gathering point's nameplate. It marks the final destination where everyone meets during an evacuation - not just a quick pit stop, but the place where you'll wait until emergency services give the all-clear.
Here's where it gets important: assembly areas aren't the same as muster points. A muster point is like a temporary checkpoint where wardens do a quick headcount before moving everyone along. The assembly area is your final destination - the safe zone where you'll stay put until the emergency is completely resolved.
The whole point of having these designated spots is emergency planning that actually works. When chaos strikes, people naturally want to scatter or cluster wherever feels safe. But emergency wardens need everyone in one predictable location to conduct proper head counts, account for missing persons, and coordinate with fire services or paramedics.
Your assembly area needs to tick several boxes: far enough from the building to avoid falling debris or smoke, spacious enough for everyone who might evacuate, and accessible for people using wheelchairs or mobility aids. It's not just about having a sign - it's about choosing the right location that keeps everyone genuinely safe.
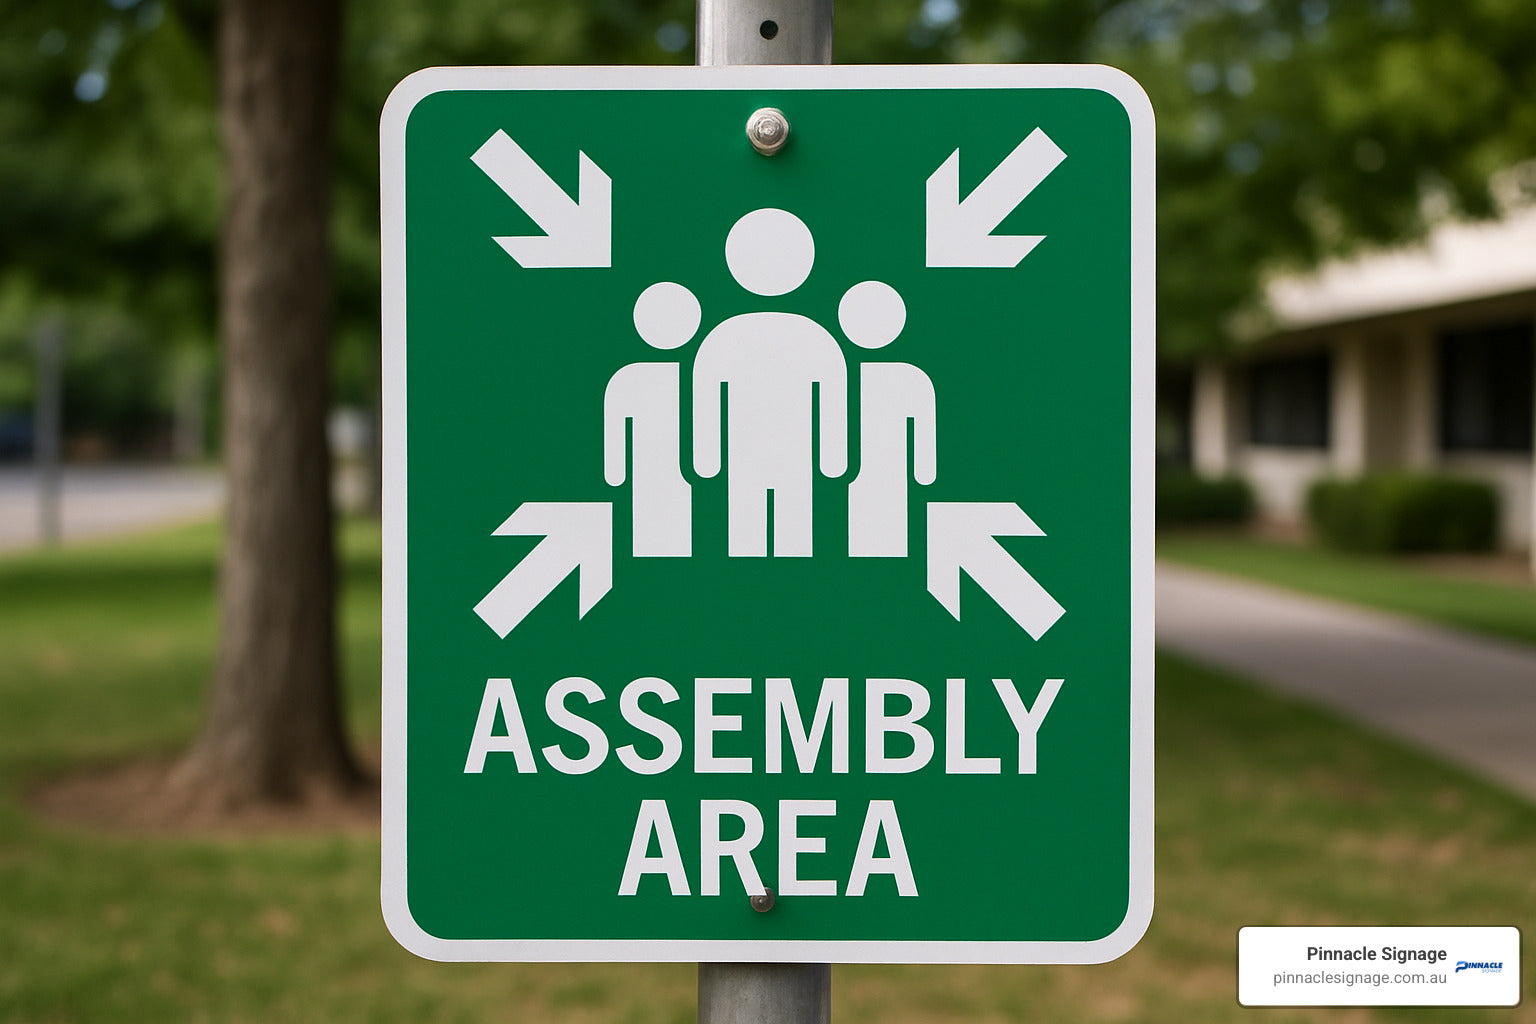
Standard Symbols on an Assembly Area Sign
Australian assembly area signs follow the AS 1319 standard, which means you'll see that familiar green background with crisp white symbols. The star of the show is the four-arrow icon - those arrows pointing inward toward a central gathering point perfectly capture what you want people to do: converge on this safe spot.
The design isn't just an Australian invention. It draws from international standards like ISO 7010, so whether you're evacuating a building in Melbourne or Manchester, the visual language stays consistent. That green colour universally signals safety and emergency information, whilst the white provides sharp contrast that works in bright sunlight or dim emergency lighting.
Many signs also include directional arrows - left, right, straight ahead, or diagonal - to guide people from different parts of your facility toward the assembly point. These directional cues are absolute lifesavers in large warehouses or multi-building sites where people might approach the assembly area from completely different directions.
Why Assembly Area Signs Matter for Safety and Compliance
When it comes to workplace safety, assembly area signs aren't just helpful—they're absolutely essential for protecting lives and keeping your business compliant with Australian law.
Under Australia's Work Health and Safety Act, employers have a clear duty of care to provide safe evacuation procedures. This includes properly marked assembly areas where people can gather safely during emergencies. It's not optional—it's a legal requirement that can save lives when things go wrong.
The AS 1319 standard sets the rules for emergency signage across Australia, covering everything from colour schemes to placement guidelines. These aren't arbitrary decisions either. The standardised green and white design ensures that anyone—whether they're a regular employee or a first-time visitor—immediately recognises where to go during an emergency.
Beyond meeting legal obligations, these signs serve a vital practical purpose. During high-stress situations like fires or evacuations, people often experience tunnel vision and struggle to think clearly. Having clear, visible assembly area signs provides immediate guidance when cognitive function is compromised by stress and adrenaline.
The consequences of getting this wrong extend far beyond paperwork headaches. Inadequate emergency signage can result in significant fines, legal liability, and—most importantly—put people's safety at risk during critical moments.
Regional Rules at a Glance
Australia takes emergency signage seriously. The AS 1319 standard mandates those familiar green rectangular signs with white symbols for emergency information. State-based WHS legislation backs this up, requiring employers to provide adequate evacuation procedures that include clearly marked assembly areas.
United Kingdom regulations require Fire Assembly Point Signs to be displayed outside buildings, showing everyone where to gather during fire emergencies. The Regulatory Reform (Fire Safety) Order 2005 enforces this, and non-compliance can lead to prosecution.
United States follows OSHA standards for emergency signage, though specific assembly area requirements vary by state and local jurisdiction. Penalties for inadequate emergency preparedness can exceed $13,000 per violation—a costly reminder of why proper signage matters.
The real risk isn't just the fines, though they can be substantial. If inadequate signage contributes to injuries or fatalities during an emergency, organisations may face criminal charges and civil litigation. That's why investing in proper assembly area signs isn't just about compliance—it's about protecting your people and your business.
Design, Materials and Placement: Getting Your Assembly Area Sign Right
Getting your assembly area sign placement right isn't just about compliance—it's about creating clear communication when people need it most. The key is positioning signs at eye level, typically between 1.5 and 2 metres high, where they'll catch attention without being missed in the chaos of an evacuation.
Think about how people will move through your space during an emergency. Your signs need to be visible from all primary exit paths, which often means installing multiple signs for larger sites. There's no point having a perfect sign if half your evacuees can't see it because of parked cars or equipment.
Material choice makes a real difference to both visibility and longevity. Photoluminescent signs are brilliant for power outages—they'll glow for up to 6 hours after absorbing light, ensuring your assembly area remains visible even when the lights go out. For outdoor installations, UV-stable inks prevent that embarrassing fade that leaves your signs looking washed out after a few months in the Australian sun.
Directional arrows on your signs help eliminate confusion. Instead of people wandering around looking lost, arrows pointing left, right, ahead, or diagonally guide evacuees from different parts of your building straight to the assembly area. It's like having a helpful guide even when your wardens are busy elsewhere.
Here's how assembly area signs differ from fire exit signs:
| Feature | Assembly Area Sign | Fire Exit Sign |
|---|---|---|
| Purpose | Final gathering point | Exit route guidance |
| Colour | Green background, white symbols | Green background, white symbols |
| Location | At assembly area | Along evacuation routes |
| Symbols | Four-arrow convergence icon | Running figure with arrow |
| Function | Crowd management | Route guidance |
Choosing the Right Assembly Area Sign Material
Weather exposure drives most material decisions, and it's worth getting this right the first time. Self-adhesive vinyl works well indoors and for short-term outdoor use, typically lasting 2-3 years before showing wear. But if you're installing signs in exposed outdoor locations, you'll want something tougher.
Aluminium signs are the workhorses of outdoor signage. They handle UV exposure, temperature swings, and the occasional knock from equipment or vehicles. Yes, they cost more upfront—but consider this: a $20 vinyl sign needing annual replacement costs more over five years than a $60 aluminium sign that lasts a decade.
Polypropylene offers a smart middle ground. It provides solid weather resistance at moderate pricing, making it perfect for semi-outdoor locations like covered loading docks or areas with partial weather protection. Corflute is another budget-friendly option that works well for temporary installations or indoor use.
The key is thinking about total cost of ownership rather than just the initial price tag. Our experience shows that investing in quality materials upfront saves money and headaches down the track. For detailed guidance on material selection, check out our guide on Clear and Safe: The Importance of Muster Point Signage.
Optimal Placement for an Assembly Area Sign
Line-of-sight visibility is everything. Your signs must be visible from evacuation routes without being blocked by vehicles, equipment, or that tree that looks small now but will grow into a sign-hiding monster in a few years. Regular site walks help identify potential visibility issues before they become problems.
Exit path analysis determines where your signs will do the most good. In facilities with multiple exits, people should be able to see assembly area signs from each exit point. This might mean installing multiple signs or positioning them strategically at pathway intersections where different evacuation routes converge.
Crowd capacity planning influences both sign placement and assembly area selection. Rural sites often have the luxury of space, allowing flexibility in assembly area location. Urban properties face more constraints—neighbouring buildings, busy roads, or limited space all impact where you can safely gather people.
Consider seasonal factors that might affect visibility. That beautiful deciduous tree providing shade in summer might completely hide your sign when it's in full leaf. Snow accumulation can block ground-level signage in alpine areas. Liftd mounting often provides better year-round visibility.
The WEM Guide on choosing appropriate assembly areas provides excellent site-specific guidance for different environments and industries.
Choosing the Right Assembly Area Sign Orientation
Post-mounted signs offer maximum visibility and flexibility, particularly for outdoor assembly areas. They can be positioned independently of existing structures and adjusted for optimal viewing angles. Heavy-duty posts resist wind loading and are less tempting targets for vandalism than lightweight alternatives.
Wall-mounted options work brilliantly when assembly areas are near building exteriors. They require less ground space and integrate cleanly with existing architecture. The trade-off is being limited by available wall space and potentially reduced visibility from certain angles.
Fence-mounted signs make smart use of existing infrastructure whilst providing good visibility. They're cost-effective for sites with perimeter fencing near assembly areas. Just ensure your mounting hardware can handle wind loads without damaging the fence structure—nobody wants their emergency signage causing property damage.
Portable A-frame signs offer flexibility for temporary events or sites where permanent installation isn't practical. They can be repositioned as conditions change and stored when not needed. However, they require more frequent maintenance and are vulnerable to theft or weather damage, so factor these ongoing costs into your decision.
Maintenance, Accessibility and Common Pitfalls
Even the best assembly area sign won't serve its purpose if it's faded, damaged, or blocked from view when an emergency strikes. That's why regular maintenance isn't just good practice—it's essential for keeping your workplace safe and compliant.
Scheduled inspections should become second nature. A quick monthly walk-around checking for damage, fading, or obstructions takes minutes but could save lives. During these checks, look for signs that weather has taken its toll, equipment has been moved in front of signage, or vandalism has occurred.
Faded graphics are more common than you might think, especially on budget signage exposed to Australia's harsh UV conditions. Even high-quality signs will eventually show their age, though UV-stable inks significantly extend their lifespan. When colours start looking washed out or text becomes difficult to read, it's time for replacement—not just for appearance, but for legal compliance.
Vandalism presents ongoing challenges, particularly for outdoor assembly areas in accessible locations. Graffiti, scratches, or deliberate damage can render signs completely illegible during the very moments they're most needed. Consider protective measures for high-risk locations, but any covering must not compromise visibility.
Language barriers can turn a well-planned evacuation into chaos. In workplaces with diverse staff or frequent visitors, multilingual signage or clear pictograms become crucial. The four-arrow convergence symbol works across language barriers, but additional text in relevant languages shows real consideration for your team's safety.
Don't overlook the importance of glow-in-the-dark features. Photoluminescent signs maintain visibility for up to six hours after light exposure, ensuring your assembly area sign remains visible even during power outages when emergency lighting might fail.
Updating an Assembly Area Sign for Diverse Abilities
Creating truly accessible emergency signage means thinking beyond the standard green-and-white rectangle. High-contrast colour schemes assist people with visual impairments, whilst tactile elements can help those with severe vision limitations steer to safety.
Braille labels can supplement standard signage, though they require professional installation to ensure accuracy. More universally helpful are pictograms that communicate instantly across language and literacy barriers—the reason why the four-arrow convergence symbol has become so widely recognised.
Mounting height affects accessibility more than many people realise. Signs positioned too high become difficult for wheelchair users to read, whilst those mounted too low risk being blocked by crowds or equipment during an actual evacuation.
The key is creating signage that works for everyone in your workplace, from the office worker who's forgotten their glasses to the visitor who doesn't speak English. This isn't just about being inclusive—it's about ensuring your emergency procedures actually work when tested by real-world conditions.
For comprehensive guidance on creating signage that truly serves everyone, our detailed article on Workplace Safety Made Simple: Muster Point Signs and Symbols covers the essential considerations for inclusive emergency signage design.
Integrating Assembly Area Signs into Your Emergency Plan
Assembly area signs are just one component of comprehensive emergency preparedness. Staff training ensures everyone understands evacuation procedures and assembly area locations. Regular drills test the effectiveness of signage placement and identify areas for improvement.
Visitor induction programs should include assembly area orientation, as unfamiliar people may struggle to locate gathering points during emergencies. Consider providing maps or verbal directions as part of site orientation procedures.
Emergency wardens need clear communication protocols and head count procedures. Pre-printed attendance sheets or digital check-in systems can streamline the accounting process, reducing time spent in potentially dangerous assembly areas.
The research indicates that annual evacuation drills to every assembly area are essential for maintaining emergency readiness. These exercises reveal signage visibility issues, crowd flow problems, and communication gaps that may not be apparent during routine inspections.
For detailed guidance on emergency planning integration, see our comprehensive guide: Muster Points Explained: Keeping Your Team Safe in Emergencies.
Embedding an Assembly Area Sign in Evacuation Maps
Site diagrams should clearly show assembly area locations relative to building layouts and evacuation routes. These maps require regular updates when building modifications or assembly area changes occur.
QR codes on evacuation maps can link to digital copies accessible via smartphones, providing detailed instructions or multilingual versions. This technology is particularly valuable for visitor-heavy facilities where people may be unfamiliar with evacuation procedures.
Digital evacuation plans offer advantages in dynamic environments where assembly areas may change due to construction, weather, or other factors. However, they shouldn't replace physical signage, as mobile devices may be unavailable or non-functional during emergencies.
Consider laminated pocket cards for key personnel, showing assembly area locations and emergency contact information. These backup resources ensure critical information remains available even if primary signage is damaged or obscured.
Frequently Asked Questions about Assembly Area Signs
Do I need more than one assembly area sign for a large site?
Absolutely. Large sites almost always need multiple assembly area signs to work effectively during an emergency. Think about it from an evacuee's perspective – if they can't see where to go from their exit point, they'll likely end up confused or gather in unsafe locations.
The magic number isn't set in stone, but we typically see sites needing anywhere from 3-6 signs depending on their complexity. Industrial facilities with multiple buildings, shopping centres with various tenant entrances, and large office complexes all benefit from strategic sign placement around the assembly area's perimeter.
Your site layout tells the real story. If you've got buildings positioned at different angles, landscaping that blocks sight lines, or multiple evacuation routes converging from different directions, you'll need signs positioned so every exit path has a clear view of where to go.
We recommend doing a simple walk-around test. Start from each exit point and see if you can clearly spot the assembly area signage. If there's any doubt about visibility, that's probably where you need an additional sign.
How often should an assembly area sign be replaced?
The honest answer is "it depends" – but there are some reliable guidelines to help you plan ahead. Assembly area signs made from self-adhesive vinyl typically show their age after 2-3 years outdoors, whilst quality aluminium signs can keep looking professional for 7-10 years with basic maintenance.
Environmental exposure plays the biggest role in sign lifespan. Coastal locations with salt air, industrial areas with chemical exposure, or sites with extreme temperature swings will see faster deterioration than sheltered indoor applications.
We always tell our clients to budget for replacement every 3-5 years for outdoor installations. Indoor signs can often go longer, sometimes doubling that timeframe if they're not exposed to harsh lighting or frequent handling.
The key is annual health checks. Look for fading that makes text hard to read, physical damage from weather or impact, and changes in compliance standards that might require updates. Don't wait until a sign becomes illegible – emergency signage needs to be crystal clear when people are stressed and visibility might be compromised.
Can an assembly area sign be combined with other emergency signage?
Yes, you can combine assembly area signs with other emergency information, but there's a smart way to do it. The trick is keeping the primary message clear whilst adding helpful supplementary details.
Common combinations that work well include directional arrows pointing toward the assembly area, emergency contact numbers, or brief instructions like "Wait here for further instructions." These additions can actually improve the sign's effectiveness by providing context and guidance.
The danger comes from information overload. During an emergency, people experience tunnel vision and reduced cognitive function. If your sign looks like a novel, they might miss the critical "this is where you gather" message whilst trying to process everything else.
We've found the sweet spot is keeping the main assembly area symbol and text prominent, then adding secondary information in smaller text or different positioning. Think of it like a newspaper headline – the big message grabs attention, whilst the details support understanding.
Avoid conflicting information at all costs. Don't combine assembly area signage with evacuation route directions that might send people in different directions, and steer clear of mixing temporary event information with permanent emergency signage.
Conclusion
Getting your assembly area sign right isn't just about ticking compliance boxes—it's about creating confidence that when an emergency hits, everyone knows exactly where to go. These signs become the silent guardians of your emergency preparedness, guiding people to safety when clear thinking might be in short supply.
The difference between chaos and calm often comes down to preparation. Quality assembly area signs, positioned thoughtfully and maintained properly, give your team the clear direction they need when every second counts. Whether you choose photoluminescent signs that glow in the dark or heavy-duty aluminium for harsh outdoor conditions, the investment pays dividends in safety and peace of mind.
We've seen how the right signage transforms emergency response across Australian workplaces. From busy construction sites where workers need instant visual cues, to busy retail centres where customers might be unfamiliar with evacuation routes, proper assembly area signs make all the difference.
Your emergency plan is only as strong as its weakest link. Don't let inadequate signage be that weak spot. Combined with regular training and clear communication, well-designed assembly area signs create the foundation for effective evacuations that protect lives and demonstrate your commitment to workplace safety.
For more insights on creating comprehensive emergency signage systems, check out our detailed guide: Follow the Signs to Safety: Your Guide to Evacuation Center Signage.
Ready to strengthen your emergency preparedness? At Pinnacle Signage, we understand that every site has unique challenges, and we're here to help you find the right solution. From material selection to strategic placement, our team brings the expertise to ensure your signage works when it matters most. Contact us today to discuss how we can help create safer spaces through premium signage solutions designed for Australian conditions.